Some of my favorite math units/topics are those where I feel I have a handle on how to really get my students to construct their own understanding. This is NOT the way most textbooks operate! Most textbooks have you set a clear learning target:
I can find the perimeter of a rectangle by using the perimeter formula.
Then, the teacher models how to do the problems…talks through them…gives some guided practice…some independent practice–and then assesses student understanding. It works–for some.
Instead, I really try to find ways to put students in situations where they are exploring, looking for patterns, and deriving their own rules. I have found that this type of learning is more engaging, more meaningful, and “sticks” with the learner so much better.
Here’s what this looked like with area and perimeter in my room last week. Had I used our math series in sequence, the progression would have looked something like this:
1. Teach the formula for the area of a rectangle.
2. Teach finding the area of irregular shapes by decomposing into smaller rectangles.
3. Teach the formula for the perimeter of a rectangle.
4. Practice problems with area and perimeter.
I’ve been doing this fourth grade thing a long time–and I know my students aren’t ready for that yet. We still have a TON of misconceptions that need to be worked out before we move to formulas! For example, many students still aren’t crystal clear on the difference between perimeter and area–so I certainly don’t want to teach formulas for concepts that they aren’t confident about!
Also, students aren’t ready to flexibly and correctly use labels (a “precision” issue!) related to units of length (ex. cm, in., m) as opposed to SQUARE units to measure area (we like to call it “squarea” to help with that!)
I also know from the past that students really struggle to even COUNT the squares on the side of a shape and often get confused between “inside” and “outside” of shapes.
There are other things that come up–there always are–but to jump right into formulas certainly doesn’t give students time to explore, get these misconceptions corrected, and allow the time for them to build and deepen their own understanding. Here are a few snippets of what I did BEFORE we tackled some of the work in our math book!
Our first investigation simply involved asking the students to build a rectangle using 12 tiles. Students were able to do this with ease–and then I asked them to measure their rectangles, jot the answer on a sticky note, and come up to the group to share.
We had an amazing discussion about how to measure a rectangle! Some measured only one way (“Mine was 6 squares long.”) and others used two dimensions (“Mine was 3 one and 4 the other.”). I asked if anyone measured theirs and got 12. No one had. This led to a great chat about whether or not we should measure the INSIDE of a shape or the OUTSIDE–until we realized that BOTH could be valuable! We came up with all sorts of real world examples when we would need to measure the outside edge or “rim” (peRIMeter) like fences, wallpaper borders, door frames, and so on. We also then talked about times when we might need to measure the entire area (“SQUAREA”) in units that take up space…like for carpet or tile or planting sod and so on. Once students were comfortable that there is more than one way to measure a rectangle, it was time to roll!

We continued building rectangles with set areas (like 12 square inches) and finding all sorts of different ways to do it–and we then compared the perimeters. This was a great way for us to really stress the difference between measuring and counting the inches along the edge and the squares inside–two ways to “measure” rectangles. Students started to notice what happened when they built long and skinny rectangles versus short “chubby” ones–and even were using correct vocabulary words like “length” and “width” and “perimeter”. We recorded our findings on a sheet and practiced using the correct labels–inches or square inches.
When it was clear that we were in pretty good shape in this department, I wanted to test their group work and problem solving! This time, I told them they did NOT need to use rectangles–and that I wanted them to work in teams of 6 to solve a problem. We talked about the problems that can arise with big groups (people being “bossy”, people getting off-task, etc) so we set goals to stay focused and to strive for equal participation. The task? Have each person in the group create a shape with an area of 24 square inches–where no two people have the same perimeter! This meant some people would have to give and take–and MAN it was interesting to watch some groups function (or NOT function as the case might be!)

It was so cool to listen to their discussions, the hints they gave each other, and the questions they asked. Check out the shape one student came up with–which led to quite a debate within the group. Can you do this? Can there be a “void” (a student’s word, not mine!) in the middle? I listened to the debate for quite a while and then we agreed to solve it by agreeing that we would NOT count “voids”–and that all shapes had to be solid figures. We called the other groups over to chime in–and then we reached consensus that we would proceed with that new rule.
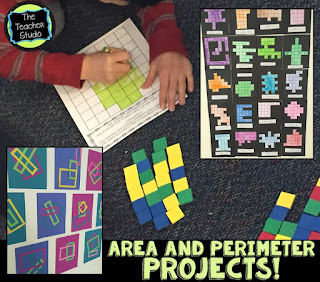
As the groups solved the task and could prove that all 6 figures had different areas, they transferred their solution over to a grid page…
Colored it…cut it…
I mounted them on black paper and hung them in the hall. They have been receiving lots of attention from passers by!
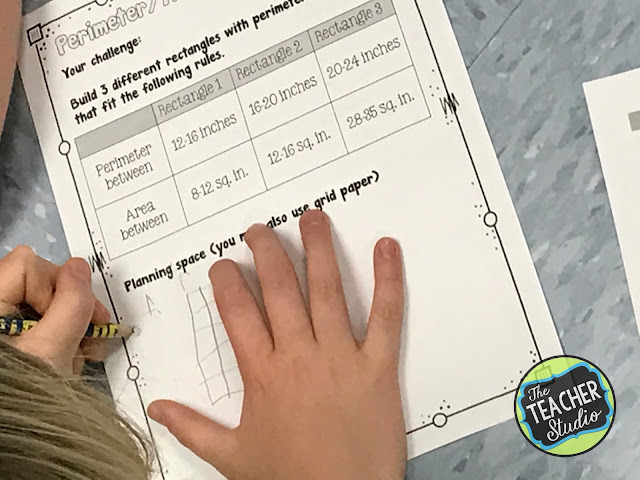
The next day, I knew I wanted to continue to push their thinking before we dug into the formula, so I used this task–find three different rectangles that meet specific area and perimeter guidelines. I reminded them that we have different tools in our classroom…tiles, graph paper, and so on–and sent them off to explore with their partners.
The discussions were amazing–and again, I reminded them to use the vocabulary list we had started on the board (I love to do this to keep that academic vocabulary fresh and accessible!) as they talked. I circulated and asked questions, asked groups to show me their strategies, and so on. Once they felt they had a solution, I told them to actually BUILD their rectangles! Once they had their exact dimensions, it was time to replicate them with paper strips!
It was amazing…as they worked, even MORE questions came up…some struggle with making right angles…some needed ruler help. It was fascinating to watch–and I was able to do some “just in time” interventions. The end product? More “Area Art” to hang in the hall!
By this point, I was feeling pretty confident that we understood the key differences between area nad perimeter and could find the area and perimeter of rectangles. That lesson in our math series where I was supposed to TELL them the formulas? Yeah…wasn’t necessary. They EASILY figured out the area and perimeter formulas as they worked through these investigations. When I showed them the lesson, they laughed! I heard things like, “Of course you multiply the length and width to get the area.” and “There are lots of formulas to find the perimeter–not just the one in the book!”. We had fun making a list of all the formulas we could think of–and then evaluated which ones made the most sense to us!
There was a lesson in the book that was worth our time–finding the area of irregular shapes–but the students were SO comfortable with rectangles that they idea of “decomposing” these odd shapes was absolutely no big deal….but I want to talk more about that later because this post is already ridiculously long! Thanks for sticking with me…I always just get so excited when I see learning make sense to my students–and that they can enjoy that learning process!
Want to see these activities and more? Just click the image below.
Want to pin this post for later? Here you go!
Thanks for stopping by–and check back for “part two”!